
Small Bakery Floor Plan Layout for a 35 m² Shop
Work out how ingredients, hot trays and finished orders move before choosing equipment for a small bakery. In the 35 m² example below, a rear door feeds the ingredient store and production line, while a front counter handles customer pickup. If your shop has a single entrance, use the second arrangement described below and check how deliveries will fit around service.
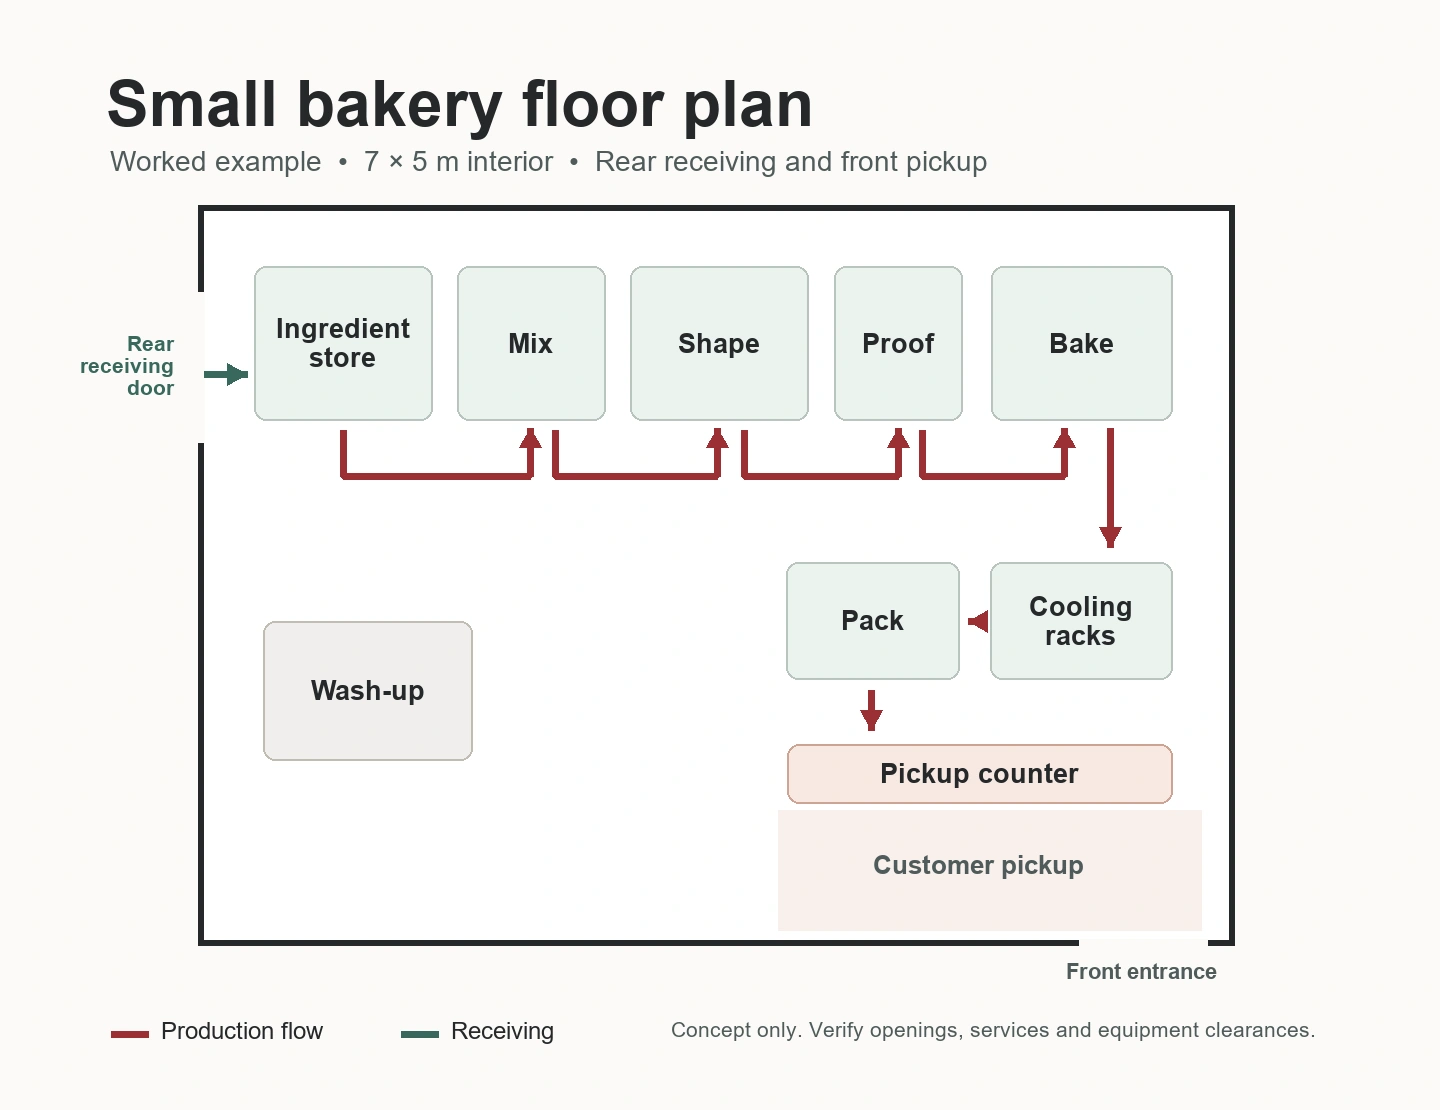
Map one batch from the mixing bowl to pickup
In the drawing, deliveries enter beside the ingredient store. Ingredients move along the back of the room through mixing, shaping, proofing and baking. Trays leaving the oven move toward cooling, then packing and pickup at the front. Wash-up sits on the other side, with room for a separate place to return used trays. Review the route with a baker who can walk through the busiest part of the shift on the drawing.
Mark both the equipment footprint and the space it uses during work. Draw the oven and cabinet doors open, place the rack where it will be loaded, and draw the path for a loaded rack. Include bench space for the next batch, a place for packaging, and any storage or staff facilities the brief requires. Confirm cleaning access, services and clearances against the selected models and site conditions.
Compare rear receiving with a single entrance
| Access | How to organize it | Что проверить |
|---|---|---|
| Rear receiving | Use the rear door for ingredients and keep unload staging beside the store. Route cooled products forward to packing. | The delivery team can reach the store while a baker unloads the oven, and carts can pass the open equipment doors. |
| Front entrance only | Mark a planned route from the front door to storage. Schedule deliveries outside pickup hours where the operation permits, and clear the route before service starts. | Boxes have a defined staging point. Customers, receiving carts and hot racks each have a route or a separate time window. |
Size the cooling area for overlapping batches
In this example, the first hour has three batches of buns, using two trays per batch and 12 buns per tray. That gives 3 × 2 × 12 = 72 buns. If two batches are cooling at the same time, allow for four usable tray positions. If all three overlap, allow for six. Use your own release times, cooling process and usable rack capacity to check which overlap actually occurs.
Draw the cooling rack in its working position. If it sits in the turning space outside the oven, compare a dedicated rack bay with a different batch sequence before adding oven capacity. Check that trays and racks are compatible with the selected equipment, and allow for unloading, wear-part access and cleaning.
Record what the supplier and site team need to confirm
- Site. A measured plan with finished walls, openings, fixed columns, delivery access and existing services.
- Production. The first products, target peak output, trays per batch, batch sequence and staffing.
- Equipment. Selected footprints, operating and service access, tray format, packed dimensions and connections.
- Sign-off. The drawing revision, the owner of each site check, and open items to settle before an order.
Start with the bakery startup equipment checklist to define the equipment groups. For a line with several shifts or stages, use the bakery production line planning guide to prepare a separate production brief.
Discuss your bakery layout with GRACE
Send the measured plan, product list, peak batch target and location of the doors and services. GRACE can help match the equipment schedule to the way you plan to produce, pack and hand over orders. Contact the project team.